Friday, November 14, 2014

Growing Pumpkin: Why Pumpkin Flower Dies and Drop off

There are a few reasons as to why pumpkin flowers dies or falls off.

One of the reason is that it wasn't pollinated. You need male and female flower to appear at the same time so that bees & ants can pollinate the flowers. If you have only female or male and none of the other sex, the fruit will not form.
Left : male pumpkin flower
Right: Female pumpkin flower.

As for my case, I was wondering how come the flower did not even bloom and it started to dies off. So I monitored my pumpkin flowers and I found out that the fruit flies stung my flower even before they bloom.

this is how the flower looks like after it is stung.


So in order to save my pumpkin flowers, I got to net them up and wait for them to bloom and then hand pollinate them using a brush.

Keep an eye on the flowers and as soon as they bloom, remove the net and hand pollinate it.


If there are fruit flies attacking your flower and fruits, you have to net all of them even after you have pollinated them. Fruit flies can also sting through net, so to be safe use finer nets, thicker nets, or wrap with newspaper and secure with a net.

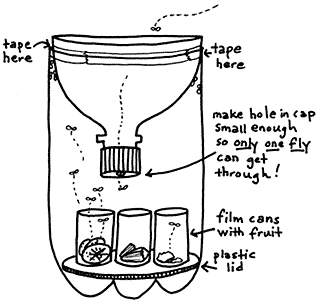
At the same time you have to trap the fruit flies FAR AWAY from your garden and NOT in your garden. You have to use the fruit fly hormone and build something like this. 


Why put it far away from your garden? The smell of the hormone can last for months. they will come from few KM radius and attack all your fruits and vege like brinjals, tomatoes, basically every damn thing in your garden. So get rid of it and also prevent them attacking your pumpkin flowers at the same time. I did this and I manage to harvest 6 pumpkins. Actually there was 7, but the last one dropped off. Maybe the fruit fly manage to puncture the net. But nevertheless the effort pays really well.


Wednesday, November 12, 2014

Essential tool for Banana Mum

Do you have a child that is going to chinese school and you're a banana mum?

Me too!

In fact I have 2 that will attend chinese school in 2015. And since I can't read or write chinese, I usually have to ask people around about what did the principal just announced and so on. But then filling forms might be a problem cos you cannot ask people to fill up for you. So 2 years ago, I went and ordered name stamps for JD and I used it when I had to fill in forms. It was so easy. So this coming year, JT will be going to standard 1 and I made new ones, with bigger fonts this time.


A standard name stamp like this is about Rm 4.50. But it also depends on your design and size.
I usually stamp all my son's textbooks, activity book and buku latihan with this too and I can use it right until they graduate from primary school. I'd say it's a rather cheap and good investment for a banana mum like me :D

Monday, November 10, 2014

Sasha Bakes: Pumpkin Hokkaido Bread

Harvested 6 pumpkins from my garden a month ago and gave 5 away. Left with one and wondering what to do with it. A quarter went into the soup. And left with 3/4. Many people in my FB asked me to make bread with it and so I thought , why not?


So googled for pumpkin bread and end up with a few versions of pumpkin Hokkaido bread and I wrote down till I have no idea where I got it from. Anyway I tried to add in and minus some of my own and here's the final recipe:

Pumpkin Hokkaido Bread


  • 100gm Steamed pumpkin (you don't have to mash it up, just dunk it into the Bread Maker)
  • 125 fresh milk
  • 1tbsp milk powder
  • 8tsp castor sugar
  • 1 tsp Salt
  • 1 egg
  • 75gm Whipping Cream
  • 330gm Bread flour
  • 1/4 tsp Clabber Girl Double Action Baking Powder
  • 40gm cake flour
  • 1tsp yeast (make a well in the flour)
  • After first beep add in 1 tbsp softened butter
  • Raisin, chia seed, pumpkin seed/sunflower seed (add in according to your preference)

Add in the ingredient from top to bottom following the sequence.
Sweet mode
Light crust
Big loaf

And your bread is ready in 2:55 hours.

Your can omit the double action baking powder, it's just that when I use that for my bread, the bread remains fluffier longer for few days. By then everything should be gone :)

The bread is cakey-bread feeling. It's sweet and very filling. You can eat it just like that, like a cake.
Definitely a keeper. Love the colour especially!


Tips:
  • To get evenly cut bread, you can buy the bread slicer from Mr.DIY for rm7.90.
  • A good bread knife is very crucial to get nice cut.


Friday, November 07, 2014

Growing pumpkins

My aim this year is to be able to plant And get at least ONE pumpkin. You know what? I got 6. *lol* it was a mental moment for me cos the plant grew wild, covered the entire veggie garden area, there was hardly any sun shining the plants underneath it (cos I elevated the plant 7 ft off the ground) , alot of mosquito, and the worst was when female flowers appearing without male and I went hunting around looking for make flowers *LOL* those were the funniest moment I had while growing pumpkins for almost 7 months.
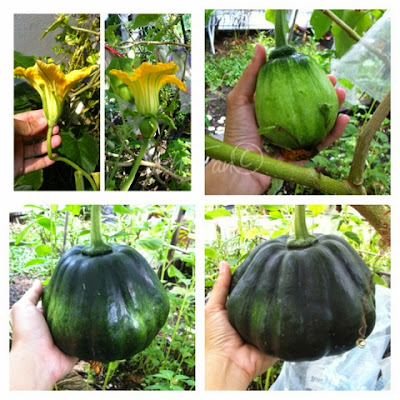
Left: male flower
Right: female flower. Notice that female has a fruit attached

How to pollinate? Use a brush and brush the pollen in the middle of the male flower and then brush it into the middle of the female flower. Make sure you brush in enough supply of pollen , otherwise your pumpkin will not make it and it will either appear like a deflated pumpkin or just rot and falls off . From my experience Only the flower that bloom on the same day can be use to pollinate. 
Once pollinated successfully you can know it the next day cos the fruit will grow alot. 
See how it transformed in just a couple of  weeks. Amazing. 

And then more and more flowers appear and I was busy running around doing the pollination work cos I had to net my flowers due to the existence of fruit fly. If there wasn't any fruit flies, the bees and ants will be able to the do the pollination for me. 
these are the baby pumpkins few days after pollination. 


and the baby grew! My first hand pollinated pumpkin. 

The biggest , the one that I had to give to my mum, just because she called me a plant murderer. She changed her mind now, I hope :P

And these were the 6 big babies that I have harvested. See that the stems are not short, it is advisable to cut it further away from the fruit cos the stem will slowly dries off, while it dries, it will bring virus and will cause the fruit to rot.  Leave the fruit at least 2 weeks before you consume it. Cos the glucose is building in there and making the pumpkin extra sweet!

One picture for the record, cos I am never going to grow pumpkins in my garden anymore.
Unless it's a baby pumpkin, or a non creeping one. hehe


I had 6 and gave away 5 to my mum, my 2 sisters in law, my ex neighbour and my 2nd sister.
And here was the first pumpkin that I have hand pollinated and left untouched for a month.

Mission accomplished. One Target Achieved for this year! :D

Sasha Bakes: Pandan Hokkaido Bread

I baked pumpkin Hokkaido bread using the pumpkin that I have harvested from my own garden the other day and my hub refused to eat it, cos he said "you know I don't eat pumpkin" but I know that's not the only reason cos he always complains that the bread from my Tesco Bread Machine is too big, not square. Don't ask me why. It's just something about square bread that he likes.

See? Not square! 


See? Too big!

Since I have a bunch of pandan leaves and left over of whipping cream, I just decided to bake another loaf although I haven't finished the pumpkin bread yet. 

For own reference: (cos my brain is failing me!)

See? Very square bread! 
The colour is not vibrant cos I'm using natural pandan colouring and flavour. If you want to have greener effect you can use pandan serani.

Ingredients:
Pandan Milk 120gm (refer to step no.1 to get Pandan Milk)
Whipping cream 75gm
Egg 1
Sugar 40gm
Salt 1tsp
Milk powder 25gm
Cake flour 30gm
1/4 tap double action baking powder (i use Clabber Girl brand)
Bread flour 270gm 
Yeast 1tsp
Butter (add in after first beep) 1 tbsp

Steps:
1. Cut pandan leaves and add in 120gm of fresh milk in Thermomix. Speed 10, 15 seconds. Remove and use a teabag  (I use the teabag bags from Daiso) and pour the mixture into the bags and give it a good squeeze. That will be your pandan milk.  

2. In the bread pan, add in ingredients from top to bottom following the sequence and after you have added the bread flour, just dig a small well and add in yeast in the middle. Do not let the salt touch the yeast. If you are using the same spoon, please make sure u wipe it real clean ya :)

3. Select Sweet Mode. 2lbs.  Doesn't matter what colour crust cos you are not baking in the bread machine. But if you are then choosing light and medium should be okay.

4. The bread maker will mix and then stop for a while. When you hear the beep sound, add in room temp butter.

5. After the machine stopped kneading, switch off the BM. But if you are baking in the bread maker, leave it and you are done.

6. If you want to shape it or bake in a pullman pan: The dough will rise double in size (45 mins -1 hour) remove from bread maker pan and punch it. Knead it till it pass the finger test (poke into the middle and the hole remains and slowly spring up) or window pane test.

7. Divide into 3 portion and flatten it then roll it up and arrange into the Pullman bread pan. (You can refer to this expert's page to see how she roll and arrange the dough in the pan. Btw, her recipes are great! ) Remember to oil your pan with butter especially the cover.  Let it rise till 70% of the Pullman bread pan.

8. Put in oven 180degree for 30 mins. The dough will rise till the entire pan is filled, so you will get a very square bread.

9. After done, remove from pan and let it cool on wire rack. Otherwise your bread will be wet.
See? Cool them like this. 

If you want even more perfect bread that looks like Gardenia or Massimo , you can use a bread cutter. Can find in Mr DIY for rm7.90

So this time my hub got what he want. Square bread. Pandan square bread. And not "not-square" pumpkin bread.
He's happy. 
I'm happy.
*lol*