Showing posts with label DIY. Show all posts

Wednesday, August 26, 2015

Teaching Time

Found this in one of the FB pages. Great idea from a teacher. So I printed out the numbers on coloured paper and laminated it.


To save my time, I added "suku" and "setengah" . Stick all the numbers of my cheap ikea clock and added battery. All done very quickly and ready to hang up the wall :)

Friday, December 26, 2014

DIY: Tape organizer

This was one of my Postponed DIY. Finally have the time to do it. 


Things you need:
  1. 2 thumbtacks
  2. PVC pipe(I  got mine from the plastic book wrapper roll- Wah they actually use PVC now instead of paper!) 
  3. 2 PET bottle cap


Cut one part the bottle cap just enough for the PVC pipe to pass through

Use a thumbtack and press the PET bottle to the side of the bookshelf/rack. Then measure the PVC pipe, just long enough to slide through the opening of te PET cap.

Tadaa! Now you can hang and organize your tapes. No more searching hi and low for it when you need it.


You can save space by hanging it high and placing other stationaries at the bottom.

Yay! Another DIY mission accomplish before year end! Happy New Year! 

Wednesday, February 19, 2014

DIY flashcard holder

A DIY upcycled cereal box turned into a flashcard holder. 

To help JT to learn how to read, I have been using flashcards. And sometimes I like to test him to see how much he knows. I usually use my hand to cover the pic but since I have a cereal box lying around, I thought why not up cycle it.


 I turned it inside out so that JT won't e distracted with the wording and pictures on the box. 


Just fold it inside out and secure it with tape.  Then place your flashcard over and draw boxes that will show the wordings and cut according to the measurement/drawing. 


This is how he uses it.


Happy D-I-Y!

Monday, September 30, 2013

Plateless Refreshment

I was the emcee for an event yesterday. On top of that, I am also in charged of the refreshment. Since we are NGOs and we're so poor, we have to save and use whatever we have. I was planning to make it a plate-less refreshment session.
I have some toothpicks and also decorated celotape. This is what I did.


And just fold them into half. There, a mini flag. If you want, you can also cut a V in the middle to make it more attractive. 

And you can just poke it to your finger food like this.

This is what I got for the 5 minute refreshment session for 50 ppl.

And this was the stickiest food. I used some Daiso bento baran to separate the kuihs.

And everyone ate the kuih just like that without any plate and they thought I bought the mini flags. :D
This is what happen when you have someone very frugal handling the refreshment session *lol*

Wednesday, December 05, 2012

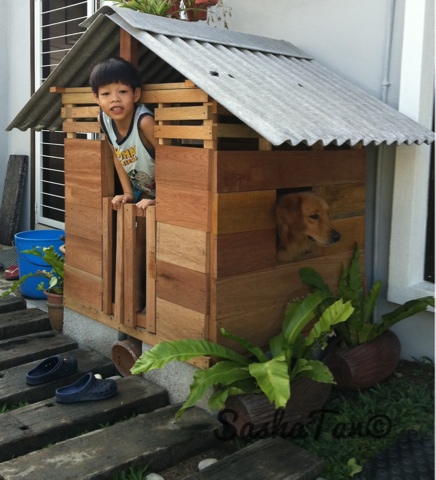
DIY: DogHouse + PlayHouse (part 2)

The next day, I woke up and began hammering the walls onto the frames. My 2nd sis dropped by and she helped me to hammer some on while I saw the woods. But after sometimes I asked her to stop cos the structure is still very flimsy and since its heavier at the sides, the entire structure shakes more. :(

Another worry is that my dog refused to go into the structure. So my kids tried to persuade him and went in with him. The next day (how many days already? I lost count!) I removed the entire structure and redo them again. I KID YOU NOT. I removed the entire structure and started to hammer the walls onto the frame and then rejoined them back again with L-brackets and screws. This time the structure was much better than before. And the best part was when we found out that my dog started to rest in the half done structure.


After that, I abandoned my project for a week cos I was rushing my design project for my customer. Everyday I just walk pass my half done dog house and I get very stressed with it. First the house was half finished. I don't even know if I can finish it or it will last or not. Second, my front porch was in a mess with tools everywhere and I was worried that my dog will swallow some nails or screws. So as soon as I was done with my designing project, I went and sat in my structure and I thought this place need more ventilation.

 So the next day I removed the top part of the wall panel and exchange them with smaller wood for better ventilation. And again I went to the hardware shop and asked for roof pricing. The lady boss was abit pissed with me , with my questions and she asked me "you got big dog meh? you build the doghouse yourself ah? can meh?" So I showed her the half done structure and she laughed. And then she began to talk to me. Weird right? probably she thought that I'm a woman and I can't do serious carpentering.

So when the roof came (yeah delivered by lorry together with my other bricks for my garden) I began to put the pieces together. So happened that my SIL came so together, she + my hub + I carried the structure (heavy!!!!) to my veg patch and then I started to hammer the roof on.
.
.
.
.
.
.
.
.
.
.
.
.
.
.
.


When JD came out he said "WOW! MAMI! YOU'RE A GENIUS!!!"
Cos to him, anyone that can build or create something, is a genius.
My hub came out and just looked at the doghouse and gave me a hug and said "i'm proud of you".


So why is the title called DogHouse + PlayHouse?
I was thinking, if my dog were to reject the house, then probably my kids can use it as playhouse. But since my dog accepted the house and my kids are small enough to go in and play, so it serves as 2 purpose . 

Before I started, I received many negative comments and I was in doubt "can i do it with no help?"I have always told my sons that no matter what, whether you are a boy or a girl, a person with disability, with no knowledge of something (google is always around), we cannot give up. We just got to try hard and persevere and even if we fail, at least we tried. And so I tried, and there were so many times that I wanted to give up and just take down the entire structure and make a shelf or something else with the wood. But I thought, Dang! my son saw me started the sketch, then started the frame and then built it half way. If I did not finish the project, what will they think about their mom? So, I kept going on and on and finally I did it. And I'm glad I didn't give up.

People who are good in carpentering might think that my doghouse is crappy and might not last. Hey, I agree. It sucks but at least my son thinks that I'm a genius. *LOL*

Tuesday, December 04, 2012

DIY: DogHouse + PlayHouse (part 1)

I went around hunting for a dog house for my dog, and my jaws dropped. Rm1.4k for a doghouse.

Although it's high quality and can last for 10years, its rather small for just one dog. I'm planning to have 2 dogs so if I were to order a house that fits 2 dogs, it's gonna cost me a BOMB.

Initially I wanted to recycle the woods from our renovation to build a doghouse. But after I tried to saw one pc of it, I gave up. It's too thick and at the end we called our construction worker to come over and help us build raised bed for my veg patch. I thought I'm just gonna scrap the doghouse idea off until one night at11pm, I found my dog wet. He saw me working at my kitchen and he accompanied me and he was soaking wet cos my kitchen door doesn't have a proper awning to block the rain. So I decided, I'm gonna build a dog house for him, myself!

So I began sourcing for wood sizes and prices on my birthday, 12th November. To start things off, i bought myself a hammer on that day. *lol*

I tell you, the people at the hardware store is pissed with me. They must be thinking this crazy woman is wasting our time. If 8ft how much? if 10 ft leh? if 12 ft leh?


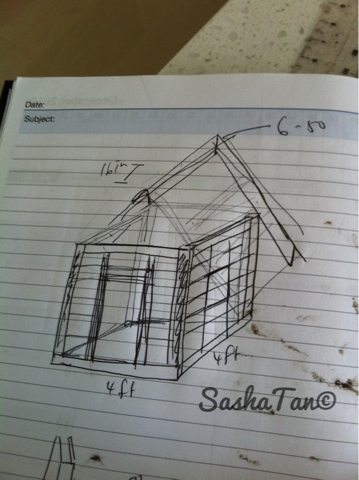
After I got the measurement of the woods and the prices, I went home and began sketching the house plan. My son call it the "blue print".


And I calculated the $ involved, and again I was stunned. My initial costing came up to rm700. I was upset and was about to give up. My husband asked "Rm700, how many days to make? Is it better to just buy?"

The next day, I began sketching again. And I modified the plan and recalculated. Ah.. This time is within my budget


So the next day I went to the hardware shop and ordered the wood. It came in 8ft, 10ft and 12ft. You need to calculate the measurement and tell them exactly where to cut. I measured the wood myself (yes, cos they are not gonna be responsible if they cut it wrongly and you will waste your wood) and monitored them while they cut the wood shorter so that I can transport them home in my sedan car.

I went home and my husband was surprised that I'm serious about it. But he left me alone cos he knows that when I'm doing a project it means DND mode.(do not disturb)

I started to saw, joined and hammer the frames together. My JD came and asked "are you a Handy mummy? (after handy manny cartoon) and I said I guess so? "Can I help you mami?" Of course!


When I was done with the frame, I was quite dissappointed with it cos the frame looks flimsy.


*sigh* I thought about it that night and I thought "worst come to worst, I can reuse the wood and make something else", right?

To be continued...


Tuesday, July 03, 2012

DIY: making toys using corrugated box


I agree.

Cos when I was young, I didn't have much toys. I only have a barbie doll given to me by my aunt. And she only has one outfit. And my sis started sewing clothes for her using scrap cloths. Then I started sewing my own barbie clothes. And that's how I started sewing.

I spent most of my time at my dad's workshop and I didnt have much toys there. I played with hammer and screwdrivers more.*lol* And once they bought some big plastic sheets as a seat cover for some expensive cars. I used the plastic sheets, stapler them together and made then into wedding gowns. I had not much toys but I have imagination. And thats what I think kids now are lack off. If you need a toy, go to the shop and buy it and nothing more.

So my kids have been imagining that they're the Picnic Wars characters:

See what I mean?

Last sat, I spent my whole day at my shop. My sis made these for my kids using corrugated box. They sat there and waited for her to draw, cut and join the parts with masking tape.


With Viking hat, with a shield and even small forks. (Jayden complaint that his horns weren't curve enough) Then my sis said the trojan hat is not so perfect yet. So she redo the hat and then she added the middle (hair???) And the lil one was so excited. He said "Now it's perfect!"


He's one very happy tomato. *lol*

It's Tuesday today and they are still playing with the hats and shield. haha

It's just so much fun looking at them looking at her making the toys with the corrugated box. At least they learnt that if they want a toy, they can opt to make them with stuff and not just go to toy'r'us to get toys. These is what I like to teach my kids ~ Make your own toys with your imagination and creativity. byob-web-advert

Friday, June 08, 2012

DIY corrugated Poster Table Standee

The corrugated leaflet standee that I made earlier only used a small portion of the corrugated paper. Lately, I'm so stressed with my design work and I wanted to release stress. And so I drew and cut again and I did this.

Ahhhh definitely feel much better after crafting something. Our very own Price List Standee (poster standee).


Before this, we just used some bottles and stick them with our price list and promo poster.
( Pic from Green Sentral: bottom right next to the yellow poster)
Super messy, I know. Cos we're only a month old and we're still figuring out how to best display the stuff around.

So with the same piece of corrugated box paper we used earlier, I measured and cut out the die-cut and made the price standee.

However, this need double layer of corrugated paper and some glue.


And I made a few more as standbys for our upcoming promotion.

And they stand side by side with my leaflet standee.


Cheap, Good and Fit perfectly into our concept.

Just wondering if anyone wants the template for the Leaflet Display Standee and The poster standee? Leave a comment  here and I might come out with something for ya ;)
byob-web-advert

Tuesday, June 05, 2012

DIY leaflet standee

Went to popular bookstore to look for an acrylic standee for our leaflet and it was rm12.90. It's not expensive but I thought of the roots of our mission and it is to minimize the usage of plastic. So I went back to the shop and saw that my sis had collected some corrugated paper but she had no idea what to use it for (yet). Voila! Just what I need!

So I quickly measured the leaflet, drafted a die-cut, then draw and cut according to the measurement.

Maybe I've designed too many boxes, the standee folded and locked perfectly without any glue or tape.


I'm happy with the outcome and the fact that I didn't buy the acrylic standee.

See our tagline? Save mother earth :)


byob-web-advert

Tuesday, May 15, 2012

Thanks babes!

I received a big bouquet of congratulatory flower on the opening of BYOB Subang last 5th May from Barbara, Elaine and Annie. What a surprise! Thanks babes! So it's been a week and the flowers started to wither. So I have no choice but to discard the flowers and I found out that the metal stand is very sturdy. So I converted it to a blackboard stand for our promotion. Not bad right? Haha so thanks girls, you not only gave me a bouquet of flowers but you guys gave me a blackboard stand too :)
left: me and the big bouquet stand , right the recycled bouquet stand turned into a blackboard holder.